
what make this Ham and Cheese Sliders special
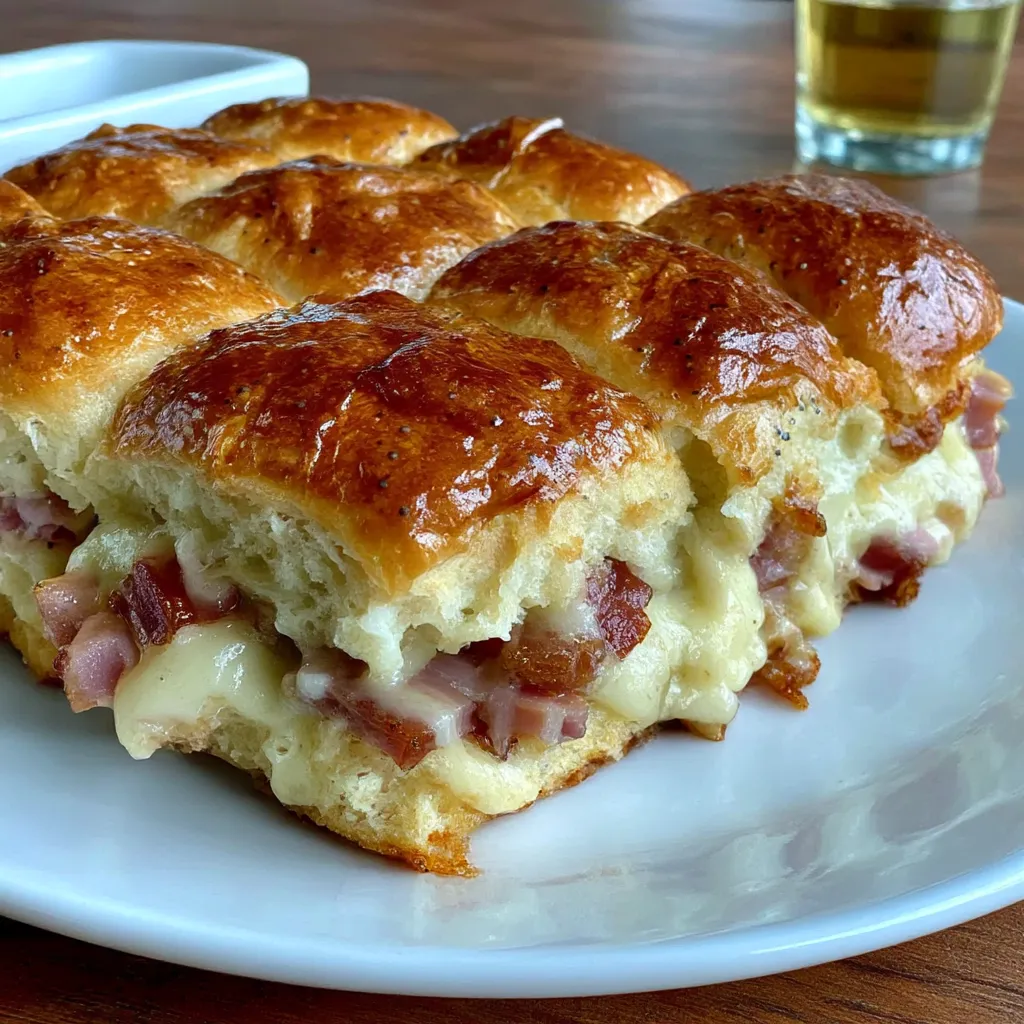
These Ham and Cheese Sliders blend comfort with practicality. I reach for them on busy weeks when warmth and simplicity matter most. The soft Hawaiian rolls cradle turkey ham and melty Swiss or cheddar, all crowned with a garlic butter glaze. They bake to a bubbly, golden crown that makes the kitchen smell like a cozy Friday night. Best of all, they’re make-ahead friendly, so you can prep ahead and serve with confidence.
Table of Contents
Table of Contents
Step 1: Prep for Ham and Cheese Sliders
First, gather the ingredients: 12 Hawaiian rolls, 12 slices turkey ham, and 12 cheese slices. Preheat the oven to 350°F (175°C). Lightly grease a baking dish. This quick prep keeps the process smooth and stress-free.
Step 2: Layer the Ham and Cheese Sliders
Slice the rolls in half horizontally. Place the bottom halves in the dish. Layer ham, then cheese, then top halves. This neat stack ensures even melting and easy slicing later.

Step 3: Prepare Butter Topping for Ham and Cheese Sliders
Melt the butter and whisk in 1 tsp poppy seeds, 1 tsp garlic powder, and ½ tsp onion powder. The butter glaze adds aroma, sheen, and a touch of toasty flavor. It’s the secret to a glossy finish.
Step 4: Bake the Sliders to Golden Perfection
Brush the butter topping over the tops. Cover loosely with foil and bake 15 minutes. Uncover and bake 5–7 minutes more until the cheese is melted and the tops are golden. The kitchen will smell irresistible.
Step 5: Serve the Ham and Cheese Sliders
Let them rest briefly, then slice and serve warm. They’re perfect for a quick weeknight dinner or a casual party platter. Napkins optional, happiness guaranteed.
Ingredients for Ham and Cheese Sliders
Here’s the quick overview of everything you’ll need. Exact quantities print at the bottom of the article for your grocery list. If you’re short on time, you can skip or swap a few items, but the core flavors stay strong.
Roll and Filling Staples for Ham and Cheese Sliders
- 12 Hawaiian rolls
- 12 slices turkey ham
- 12 slices Swiss or cheddar cheese
- ¼ cup mayonnaise
- 2 tbsp Dijon mustard
Butter Topping Essentials for Ham and Cheese Sliders
- 4 tbsp butter, melted
- 1 tsp poppy seeds
- 1 tsp garlic powder
- ½ tsp onion powder
Exact quantities are printed at the bottom of the article and available for printing. The notes also include substitutions and tips for flexible flavor.
How to Make Ham and Cheese Sliders
Here’s a practical, step-by-step approach you can follow in real life. I’ve kept the steps clear and scannable so you can cook between meetings or after the kids’ activities. The key is organization and a little patience for melted magic.
Step 1: Prep for Ham and Cheese Sliders
Preheat the oven to 350°F (175°C). Lightly grease your baking dish. Slice the rolls and lay the bottom layer in place. This is the foundation for even melting.
Step 2: Layer the Ham and Cheese Sliders
Spread the mayo and Dijon on the cut sides of the rolls. Layer ham and cheese evenly. Top with the roll lids. A neat arrangement makes slicing later a breeze.
Step 3: Prepare Butter Topping for Ham and Cheese Sliders
Mix the melted butter with poppy seeds, garlic powder, and onion powder. This fragrant glaze brings everything together in one glossy finish.
Step 4: Bake the Sliders to Golden Perfection
Brush the tops with the butter mixture. Cover with foil and bake for 15 minutes. Remove foil and bake 5–7 minutes more until bubbly and brown at the edges.

Step 5: Serve the Ham and Cheese Sliders
Let them rest a minute, then slice and serve warm. They disappear fast, so keep a spare pan ready for seconds.
Tips for Success
- Assemble ahead for richer flavor; refrigerate before baking.
- Swap cheddar for pepper jack for a mild kick.
- Use pin dots of butter on the edges for extra browning.
Equipment Needed
- Baking dish
- Medium bowl for butter topping
- Spreading knife
- Measuring cups and spoons
Variations
- Pepper jack cheese for a spicier bite
- Swiss with smoked turkey for a deeper flavor
- Light mayo with yogurt for a lighter creaminess
Why You’ll Love This Ham and Cheese Sliders
They’re easy, fast, and forgiving. The melty cheese, tender ham, and buttery top feel special without extra effort. Perfect for busy moms and professionals who want a comforting win without a long cleanup.
What I love most is how this recipe fits real life: a weeknight victory, a make-ahead option, and flavor. You get cozy, comfort without chaos—Ham and Cheese Sliders feel like a warm hug.
Serving Suggestions
- Pair these Ham and Cheese Sliders with a crisp green salad, fresh fruit, or a bright cucumber slaw for contrast and balance.
- Offer easy drinks like lemonade or iced tea and set out plenty of napkins for guests.
- Present them on a large platter, garnish with parsley, and add pickle spears for color and crunch.
Make It Ahead and Party-Worthy: Ham and Cheese Sliders for Busy Weeks
When my schedule feels like a whirlwind, these Ham and Cheese Sliders are my anchor. They taste comforting, yet they’re designed for real life. Assemble ahead, chill, then bake when the timer allows. They stay soft, stay flavorful, and travel well, which makes them perfect for weeknights, potlucks, or quick family dinners after a long day.
- Assemble up to 4 hours ahead; cover tightly and refrigerate to lock in moisture and let the flavors mingle.
- For a crowd, bake two pans side by side; if your oven is tight, bake one pan, then the other.
- Brush the tops with the butter-topping before refrigerating or right before baking; this keeps the glaze glossy and the edges bronzed.
- Hosting tip: bake just before serving and keep warm in a low oven (200–250°F) for up to 30 minutes.
- Leftovers store in an airtight container in the fridge; reheat in a 350°F oven for 8–10 minutes or in an air fryer for 5–7 minutes.
- To freeze ahead, assemble unbaked sliders, wrap well, freeze. Thaw overnight in the fridge and bake as directed for a fresh-baked texture.
FAQs
Can I store leftovers?
Yes. I cool completely, then refrigerate leftovers from Ham and Cheese Sliders in an airtight container. I reheat in a 350°F oven for 8–10 minutes until hot and the cheese is melty. If you’re short on time, I find the air fryer at 350°F works in 5–7 minutes.
Can I use different cheese?
Absolutely. Swiss is classic for melt, but pepper jack adds a gentle kick. I find cheddar works too and can be mixed with Swiss for depth. Feel free to mix cheeses for your family’s taste.
Can I assemble ahead?
Yes. I assemble the Ham and Cheese Sliders and refrigerate up to 4 hours before baking. The chill deepens the flavors and keeps the rolls soft. For best texture, I don’t exceed 4 hours to avoid soggy bottoms.
Can I freeze before baking?
Yes. I freeze unbaked Ham and Cheese Sliders in the pan, well wrapped. Thaw overnight in the fridge before baking as directed. I bake until bubbly and golden.
Is this dish halal-friendly?
Yes, for Ham and Cheese Sliders, as long as all ingredients meet halal standards. I check ham and cheese sources for compliance. If needed, I choose halal-certified options.
Final Thoughts
Whenever life feels busy, I turn to Ham and Cheese Sliders for a warm, reliable hug from the stove. They come together fast, bake to bubbly perfection, and travel well to potlucks or late team huddles. I love how the simple assembly rewards me with glossy tops and creamy melt, not a mountain of pots to wash. This recipe fits real schedules, yet it delivers comfort that feels special. Leftovers reheat beautifully, and the make-ahead option keeps weeknights calm. If you crave ease without compromising flavor, this is your trusty go-to that turns a chaotic evening into something comforting tonight.
what make this Ham and Cheese Sliders special
Ham and Cheese Sliders are my go-to during chaotic weeks. I reach for them when warmth and practicality matter most. This recipe, Ham and Cheese Sliders, bowls together tender turkey ham with melty Swiss or cheddar in soft Hawaiian rolls, all crowned with a garlicky butter glaze. They bake into a bubbly, golden crown and fill the kitchen with cozy, inviting aromas. Best of all, they’re make-ahead friendly, so you can prep, refrigerate, and serve with confidence when time is tight. You’ll notice how the rolls stay soft yet sturdy, ready for a crowd. This is comfort you can count on.
Step 1: Prep for Ham and Cheese Sliders
I gather 12 Hawaiian rolls, 12 slices turkey ham, and 12 cheese slices.
Preheat the oven to 350°F (175°C) and lightly grease a baking dish.
Step 2: Layer the Ham and Cheese Sliders
Slice the rolls in half horizontally.
Place bottom halves in the dish, then layer ham, then cheese, then top halves.
Step 3: Prepare Butter Topping for Ham and Cheese Sliders
Melt butter and whisk in 1 tsp poppy seeds, 1 tsp garlic powder, and ½ tsp onion powder.
This fragrant glaze brings everything together with a glossy finish.
Step 4: Bake the Sliders to Golden Perfection
Brush the butter topping over the tops.
Cover loosely with foil and bake 15 minutes.
Uncover and bake 5–7 minutes more until cheese is melted and the tops are golden.
Step 5: Serve the Ham and Cheese Sliders
Let them rest briefly, then slice and serve warm.
They disappear quickly, especially with plenty of napkins on hand.
Ingredients Ham and Cheese Sliders
I love keeping these ingredients simple and reliable for Ham and Cheese Sliders. The goal is cozy flavor with minimal fuss, perfect for busy days. A few well-chosen items pull together comfort, speed, and crowd-pleasing melt. I often prep the pantry with confidence, knowing this combo works every time.
Gathering these items is half the joy. It feels like setting up a little kitchen party, ready to go in minutes.
Roll and Filling Staples for Ham and Cheese Sliders
- 12 Hawaiian rolls — the soft, slightly sweet base that keeps slices neat and foldable, perfect for sliders.
- 12 slices turkey ham — lean, mild meat that stacks evenly for uniform melt in every bite.
- 12 slices Swiss or cheddar cheese — choose Swiss for creamy melt or cheddar for a bit of bite.
- ¼ cup mayonnaise — moisture and creaminess that balance the tang from Dijon.
- 2 tbsp Dijon mustard — adds brightness and a sharp contrast to the rich cheese.
Exact quantities print at the bottom of the article and are available for printing. If you can’t find Swiss, cheddar works fine; pepper jack adds a kick.
Butter Topping Essentials for Ham and Cheese Sliders
- 4 tbsp melted butter — the glossy glaze that anchors flavors and helps browning.
- 1 tsp poppy seeds — tiny crunch and pretty specks on top.
- 1 tsp garlic powder — pungent aroma that makes the kitchen feel like a café.
- ½ tsp onion powder — adds depth without overpowering the cheese.
For dairy-free kitchens, you can substitute a light olive oil brush and skip butter; flavor shifts, though.
How to Make Ham and Cheese Sliders
Here’s how I put together Ham and Cheese Sliders with calm, practical steps you can follow. They come together fast and feel like a warm hug from the stove. I love how this recipe blends comfort with crowd-pleasing ease, especially on busy nights. The steps below keep things simple, but the result is big on flavor and make-ahead magic.
Step 1: Prep for Ham and Cheese Sliders
First, I prep my station for Ham and Cheese Sliders. I gather 12 Hawaiian rolls, 12 slices turkey ham, and 12 cheese slices. I preheat the oven to 350°F (175°C) and lightly grease a baking dish. I slice the rolls in half horizontally and lay the bottom halves in the dish. I set out ¼ cup mayonnaise and 2 tbsp Dijon mustard for easy spreading. I keep a kitchen towel handy to catch any drips and stay organized. Exact quantities print at the bottom of the article for printing.
Step 2: Layer the Ham and Cheese Sliders
I spread mayo and Dijon on the cut sides of the rolls. Layer the ham slices evenly, then place the cheese on top. I cover with the roll tops, keeping edges neat so they melt evenly. If you like extra cheese, you can tuck a little more along the edges for extra ooze. I find that tidy layers help every bite stay creamy and balanced. This is the moment the sliders start to feel like a little party in a tray. Ham and Cheese Sliders come alive when the layers stack evenly.
Step 3: Prepare Butter Topping for Ham and Cheese Sliders
I melt 4 tbsp butter and whisk in 1 tsp poppy seeds, 1 tsp garlic powder, and ½ tsp onion powder. The garlic butter glaze brings a toasty aroma and a glossy finish. I brush a portion of the glaze over the tops first, then reserve the rest for after the bake. If you want extra shine, glaze the tops again right before the final bake. A pinch of dried herbs can be folded in for a herby twist. Exact quantities print at the bottom; you’ll have them handy whenever you print the recipe.
Step 4: Bake the Sliders to Golden Perfection
I brush the remaining butter topping over the tops. I cover the dish loosely with foil and bake for 15 minutes. After 15 minutes, I uncover and bake for 5–7 minutes more until the cheese is melted and the edges are golden. I keep an eye on the tops to avoid over-browning. If the tops brown too fast, I tent the dish with foil and lower the oven temperature slightly. I let the sliders rest for a minute or two before slicing to keep the fillings from oozing. This is where the kitchen fills with that irresistible, melty scent.
Step 5: Serve the Ham and Cheese Sliders
I slice the sliders between the rolls and serve them warm. I arrange them on a platter with napkins for quick grabbing. I like to offer extra pickles or fruit on the side for color and balance. If there are leftovers, I cover them and refrigerate for easy reheat. Reheating is quick in the oven or air fryer, keeping the texture nice and soft. These sliders shine as a weeknight dinner or a party snack that disappears fast.
Tips for Success
- Assemble Ham and Cheese Sliders up to 4 hours ahead and refrigerate; chilling deepens flavors.
- Keep the rolls tightly wrapped in the pan to prevent sogginess.
- Brush the tops with the butter-topping before baking for glossy, golden edges.
- If your oven runs hot, tent with foil and drop temp 25°F to avoid scorching.
- Let the sliders rest 5 minutes after baking to set the cheese for clean slices.
- Use parchment to lift easy servings, especially for a party tray.
Equipment Needed
- Baking dish or casserole pan (9×13 inch) or any ovenproof dish
- Large cutting board and spreading knife
- Spreading knife or butter knife
- Measuring cups and spoons
- Mixing bowl for butter topping
- Pastry brush or small silicone brush for butter glaze
- Foil and parchment paper as alternatives
- Oven mitts for safe handling
Variations
- Cheese swaps: Swiss, cheddar, pepper jack, or provolone mix melt beautifully; mix and match for depth.
- Spice it up: add sliced jalapeños or a drizzle of hot honey with the butter topping.
- Make it lighter: swap part of the mayo with Greek yogurt and use a lighter butter or olive oil brush.
- Meat options: try roast turkey, thin-sliced salami, or, for a veggie version, sautéed mushrooms with herbs.
- Gluten-free option: use gluten-free slider buns; confirm sauces are gluten-free and avoid cross-contamination.
- Crunch and aroma: sprinkle fried onions or chopped chives on top after baking for texture.
- Herb twist: add a pinch of dried thyme or rosemary to the butter topping for aroma.
Why You’ll Love This Ham and Cheese Sliders
As a busy home cook, I reach for Ham and Cheese Sliders when weeknights feel crowded and the kitchen needs a hug. They’re easy to assemble, bake, and share, with melty cheese and a buttery glaze that always pleases.
What I love most is how this recipe fits real life: a weeknight victory, a make-ahead option, and flavor. You get cozy, comfort without chaos—Ham and Cheese Sliders feel like a warm hug.
Serving Suggestions
- Pair these Ham and Cheese Sliders with a crisp green salad, fresh fruit, or a bright cucumber slaw for contrast and balance.
- Offer easy drinks like lemonade or iced tea and set out plenty of napkins for guests.
- Present them on a large platter, garnish with parsley, and add pickle spears for color and crunch.
Make It Ahead and Party-Worthy: Ham and Cheese Sliders for Busy Weeks
When my schedule feels like a whirlwind, these Ham and Cheese Sliders are my anchor. They taste comforting, yet they’re designed for real life. Assemble ahead, chill, then bake when the timer allows. They stay soft, stay flavorful, and travel well, which makes them perfect for weeknights, potlucks, or quick family dinners after a long day.
- Assemble up to 4 hours ahead; cover tightly and refrigerate to lock in moisture and let the flavors mingle.
- For a crowd, bake two pans side by side; if your oven is tight, bake one pan, then the other.
- Brush the tops with the butter-topping before refrigerating or right before baking; this keeps the glaze glossy and the edges bronzed.
- Hosting tip: bake just before serving and keep warm in a low oven (200–250°F) for up to 30 minutes.
- Leftovers store in an airtight container in the fridge; reheat in a 350°F oven for 8–10 minutes or in an air fryer for 5–7 minutes.
- To freeze ahead, assemble unbaked sliders, wrap well, freeze. Thaw overnight in the fridge and bake as directed for a fresh-baked texture.
FAQs
Can I store leftovers?
Yes. I cool completely, then refrigerate leftovers from Ham and Cheese Sliders in an airtight container. I reheat in a 350°F oven for 8–10 minutes until hot and the cheese is melty. If you’re short on time, I find the air fryer at 350°F works in 5–7 minutes.
Can I use different cheese?
Absolutely. Swiss is classic for melt, but pepper jack adds a gentle kick. I find cheddar works too and can be mixed with Swiss for depth. Feel free to mix cheeses for your family’s taste.
Can I assemble ahead?
Yes. I assemble the Ham and Cheese Sliders and refrigerate up to 4 hours before baking. The chill deepens the flavors and keeps the rolls soft. For best texture, I don’t exceed 4 hours to avoid soggy bottoms.
Can I freeze before baking?
Yes. I freeze unbaked Ham and Cheese Sliders in the pan, well wrapped. Thaw overnight in the fridge before baking as directed. I bake until bubbly and golden.
Is this dish halal-friendly?
Yes, for Ham and Cheese Sliders, as long as all ingredients meet halal standards. I check ham and cheese sources for compliance. If needed, I choose halal-certified options.
Final Thoughts
Whenever life feels busy, I turn to Ham and Cheese Sliders for a warm, reliable hug from the stove. They come together fast, bake to bubbly perfection, and travel well to potlucks or late team huddles. I love how the simple assembly rewards me with glossy tops and creamy melt, not a mountain of pots to wash. This recipe fits real schedules, yet it delivers comfort that feels special. Leftovers reheat beautifully, and the make-ahead option keeps weeknights calm. If you crave ease without compromising flavor, this is your trusty go-to that turns a chaotic evening into something comforting tonight.
what make this Ham and Cheese Sliders special
Ham and Cheese Sliders are my go-to during chaotic weeks. I reach for them when warmth and practicality matter most. This recipe, Ham and Cheese Sliders, bowls together tender turkey ham with melty Swiss or cheddar in soft Hawaiian rolls, all crowned with a garlicky butter glaze. They bake into a bubbly, golden crown and fill the kitchen with cozy, inviting aromas. Best of all, they’re make-ahead friendly, so you can prep, refrigerate, and serve with confidence when time is tight. You’ll notice how the rolls stay soft yet sturdy, ready for a crowd. This is comfort you can count on.
Step 1: Prep for Ham and Cheese Sliders
I gather 12 Hawaiian rolls, 12 slices turkey ham, and 12 cheese slices.
Preheat the oven to 350°F (175°C) and lightly grease a baking dish.
Step 2: Layer the Ham and Cheese Sliders
Slice the rolls in half horizontally.
Place bottom halves in the dish, then layer ham, then cheese, then top halves.
Step 3: Prepare Butter Topping for Ham and Cheese Sliders
Melt butter and whisk in 1 tsp poppy seeds, 1 tsp garlic powder, and ½ tsp onion powder.
This fragrant glaze brings everything together with a glossy finish.
Step 4: Bake the Sliders to Golden Perfection
Brush the butter topping over the tops.
Cover loosely with foil and bake 15 minutes.
Uncover and bake 5–7 minutes more until cheese is melted and the tops are golden.
Step 5: Serve the Ham and Cheese Sliders
Let them rest briefly, then slice and serve warm.
They disappear quickly, especially with plenty of napkins on hand.
Ingredients Ham and Cheese Sliders
I love keeping these ingredients simple and reliable for Ham and Cheese Sliders. The goal is cozy flavor with minimal fuss, perfect for busy days. A few well-chosen items pull together comfort, speed, and crowd-pleasing melt. I often prep the pantry with confidence, knowing this combo works every time.
Gathering these items is half the joy. It feels like setting up a little kitchen party, ready to go in minutes.
Roll and Filling Staples for Ham and Cheese Sliders
- 12 Hawaiian rolls — the soft, slightly sweet base that keeps slices neat and foldable, perfect for sliders.
- 12 slices turkey ham — lean, mild meat that stacks evenly for uniform melt in every bite.
- 12 slices Swiss or cheddar cheese — choose Swiss for creamy melt or cheddar for a bit of bite.
- ¼ cup mayonnaise — moisture and creaminess that balance the tang from Dijon.
- 2 tbsp Dijon mustard — adds brightness and a sharp contrast to the rich cheese.
Exact quantities print at the bottom of the article and are available for printing. If you can’t find Swiss, cheddar works fine; pepper jack adds a kick.
Butter Topping Essentials for Ham and Cheese Sliders
- 4 tbsp melted butter — the glossy glaze that anchors flavors and helps browning.
- 1 tsp poppy seeds — tiny crunch and pretty specks on top.
- 1 tsp garlic powder — pungent aroma that makes the kitchen feel like a café.
- ½ tsp onion powder — adds depth without overpowering the cheese.
For dairy-free kitchens, you can substitute a light olive oil brush and skip butter; flavor shifts, though.
How to Make Ham and Cheese Sliders
Here’s how I put together Ham and Cheese Sliders with calm, practical steps you can follow. They come together fast and feel like a warm hug from the stove. I love how this recipe blends comfort with crowd-pleasing ease, especially on busy nights. The steps below keep things simple, but the result is big on flavor and make-ahead magic.
Step 1: Prep for Ham and Cheese Sliders
First, I prep my station for Ham and Cheese Sliders. I gather 12 Hawaiian rolls, 12 slices turkey ham, and 12 cheese slices. I preheat the oven to 350°F (175°C) and lightly grease a baking dish. I slice the rolls in half horizontally and lay the bottom halves in the dish. I set out ¼ cup mayonnaise and 2 tbsp Dijon mustard for easy spreading. I keep a kitchen towel handy to catch any drips and stay organized. Exact quantities print at the bottom of the article for printing.
Step 2: Layer the Ham and Cheese Sliders
I spread mayo and Dijon on the cut sides of the rolls. Layer the ham slices evenly, then place the cheese on top. I cover with the roll tops, keeping edges neat so they melt evenly. If you like extra cheese, you can tuck a little more along the edges for extra ooze. I find that tidy layers help every bite stay creamy and balanced. This is the moment the sliders start to feel like a little party in a tray. Ham and Cheese Sliders come alive when the layers stack evenly.
Step 3: Prepare Butter Topping for Ham and Cheese Sliders
I melt 4 tbsp butter and whisk in 1 tsp poppy seeds, 1 tsp garlic powder, and ½ tsp onion powder. The garlic butter glaze brings a toasty aroma and a glossy finish. I brush a portion of the glaze over the tops first, then reserve the rest for after the bake. If you want extra shine, glaze the tops again right before the final bake. A pinch of dried herbs can be folded in for a herby twist. Exact quantities print at the bottom; you’ll have them handy whenever you print the recipe.
Step 4: Bake the Sliders to Golden Perfection
I brush the remaining butter topping over the tops. I cover the dish loosely with foil and bake for 15 minutes. After 15 minutes, I uncover and bake for 5–7 minutes more until the cheese is melted and the edges are golden. I keep an eye on the tops to avoid over-browning. If the tops brown too fast, I tent the dish with foil and lower the oven temperature slightly. I let the sliders rest for a minute or two before slicing to keep the fillings from oozing. This is where the kitchen fills with that irresistible, melty scent.
Step 5: Serve the Ham and Cheese Sliders
I slice the sliders between the rolls and serve them warm. I arrange them on a platter with napkins for quick grabbing. I like to offer extra pickles or fruit on the side for color and balance. If there are leftovers, I cover them and refrigerate for easy reheat. Reheating is quick in the oven or air fryer, keeping the texture nice and soft. These sliders shine as a weeknight dinner or a party snack that disappears fast.
Tips for Success
- Assemble Ham and Cheese Sliders up to 4 hours ahead and refrigerate; chilling deepens flavors.
- Keep the rolls tightly wrapped in the pan to prevent sogginess.
- Brush the tops with the butter-topping before refrigerating or right before baking; this keeps the glaze glossy and the edges bronzed.
- If your oven runs hot, tent with foil and drop temp 25°F to avoid scorching.
- Let the sliders rest 5 minutes after baking to set the cheese for clean slices.
- Use parchment to lift easy servings, especially for a party tray.
Equipment Needed
- Baking dish or casserole pan (9×13 inch) or any ovenproof dish
- Large cutting board and spreading knife
- Spreading knife or butter knife
- Measuring cups and spoons
- Mixing bowl for butter topping
- Pastry brush or small silicone brush for butter glaze
- Foil and parchment paper as alternatives
- Oven mitts for safe handling
Variations
- Cheese swaps: Swiss, cheddar, pepper jack, or provolone mix melt beautifully; mix and match for depth.
- Spice it up: add sliced jalapeños or a drizzle of hot honey with the butter topping.
- Make it lighter: swap part of the mayo with Greek yogurt and use a lighter butter or olive oil brush.
- Meat options: try roast turkey, thin-sliced salami, or, for a veggie version, sautéed mushrooms with herbs.
- Gluten-free option: use gluten-free slider buns; confirm sauces are gluten-free and avoid cross-contamination.
- Crunch and aroma: sprinkle fried onions or chopped chives on top after baking for texture.
- Herb twist: add a pinch of dried thyme or rosemary to the butter topping for aroma.
Why You’ll Love This Ham and Cheese Sliders
As a busy home cook, I reach for Ham and Cheese Sliders when weeknights feel crowded and the kitchen needs a hug. They’re easy to assemble, bake, and share, with melty cheese and a buttery glaze that always pleases.
What I love most is how this recipe fits real life: a weeknight victory, a make-ahead option, and flavor. You get cozy, comfort without chaos—Ham and Cheese Sliders feel like a warm hug.
Serving Suggestions
- Pair these Ham and Cheese Sliders with a crisp green salad, fresh fruit, or a bright cucumber slaw for contrast and balance.
- Offer easy drinks like lemonade or iced tea and set out plenty of napkins for guests.
- Present them on a large platter, garnish with parsley, and add pickle spears for color and crunch.
Make It Ahead and Party-Worthy: Ham and Cheese Sliders for Busy Weeks
When my schedule feels like a whirlwind, these Ham and Cheese Sliders are my anchor. They taste comforting, yet they’re designed for real life. Assemble ahead, chill, then bake when the timer allows. They stay soft, stay flavorful, and travel well, which makes them perfect for weeknights, potlucks, or quick family dinners after a long day.
- Assemble up to 4 hours ahead; cover tightly and refrigerate to lock in moisture and let the flavors mingle.
- For a crowd, bake two pans side by side; if your oven is tight, bake one pan, then the other.
- Brush the tops with the butter-topping before refrigerating or right before baking; this keeps the glaze glossy and the edges bronzed.
- Hosting tip: bake just before serving and keep warm in a low oven (200–250°F) for up to 30 minutes.
- Leftovers store in an airtight container in the fridge; reheat in a 350°F oven for 8–10 minutes or in an air fryer for 5–7 minutes.
- To freeze ahead, assemble unbaked sliders, wrap well, freeze. Thaw overnight in the fridge and bake as directed for a fresh-baked texture.
FAQs
Can I store leftovers?
Yes. I cool completely, then refrigerate leftovers from Ham and Cheese Sliders in an airtight container. I reheat in a 350°F oven for 8–10 minutes until hot and the cheese is melty. If you’re short on time, I find the air fryer at 350°F works in 5–7 minutes.
Can I use different cheese?
Absolutely. Swiss is classic for melt, but pepper jack adds a gentle kick. I find cheddar works too and can be mixed with Swiss for depth. Feel free to mix cheeses for your family’s taste.
Can I assemble ahead?
Yes. I assemble the Ham and Cheese Sliders and refrigerate up to 4 hours before baking. The chill deepens the flavors and keeps the rolls soft. For best texture, I don’t exceed 4 hours to avoid soggy bottoms.
Can I freeze before baking?
Yes. I freeze unbaked Ham and Cheese Sliders in the pan, well wrapped. Thaw overnight in the fridge before baking as directed. I bake until bubbly and golden.
Is this dish halal-friendly?
Yes, for Ham and Cheese Sliders, as long as all ingredients meet halal standards. I check ham and cheese sources for compliance. If needed, I choose halal-certified options.
Final Thoughts
Whenever life feels busy, I turn to Ham and Cheese Sliders for a warm, reliable hug from the stove. They come together fast, bake to bubbly perfection, and travel well to potlucks or late team huddles. I love how the simple assembly rewards me with glossy tops and creamy melt, not a mountain of pots to wash. This recipe fits real schedules, yet it delivers comfort that feels special. Leftovers reheat beautifully, and the make-ahead option keeps weeknights calm. If you crave ease without compromising flavor, this is your trusty go-to that turns a chaotic evening into something comforting tonight.
Print
Ham and Cheese Sliders: 5 Irresistible Hacks.
- Total Time: 25 minutes
- Yield: 12 sliders 1x
- Diet: Halal
Description
Ham and Cheese Sliders: a comforting, crowd-pleasing favorite loaded with melted Swiss or cheddar cheese, turkey ham, and a buttery garlic topping on soft Hawaiian rolls. This easy, oven-baked app is perfect for parties, game nights, or quick weeknight dinners.
Ingredients
- 12 Hawaiian rolls
- 12 slices turkey ham
- 12 slices Swiss or cheddar cheese
- ¼ cup mayonnaise
- 2 tbsp Dijon mustard
For the buttery topping:
- 4 tbsp butter, melted
- 1 tsp poppy seeds
- 1 tsp garlic powder
- ½ tsp onion powder
Instructions
- Preheat oven to 350°F (175°C) and lightly grease a baking dish.
- Slice Hawaiian rolls in half horizontally and place the bottom halves in the dish.
- Spread mayonnaise and Dijon mustard evenly over the rolls.
- Layer turkey ham and cheese evenly over the rolls.
- Place the top halves of the rolls on.
- In a bowl, mix melted butter, poppy seeds, garlic powder, and onion powder.
- Brush the butter mixture generously over the tops.
- Cover loosely with foil and bake for 15 minutes.
- Uncover and bake another 5–7 minutes until golden and cheese is melted.
- Slice and serve warm.
Notes
- For richer flavor, you can assemble these a few hours ahead and refrigerate before baking.
- Feel free to substitute cheddar with pepper jack for a slight kick.
- Leftovers can be stored in the fridge and reheated in the oven or air fryer.
- Prep Time: 10 minutes
- Cook Time: 20-22 minutes
- Category: Appetizer
- Method: Bake
- Cuisine: American
Nutrition
- Serving Size: 1 slider
- Calories: Approximately 260
- Sugar: 4 g
- Sodium: 420 mg
- Fat: 18 g
- Saturated Fat: 9 g
- Unsaturated Fat: 7 g
- Trans Fat: 0 g
- Carbohydrates: 22 g
- Fiber: 1 g
- Protein: 12 g
- Cholesterol: 45 mg
Keywords: Ham and Cheese Sliders, Hawaiian Roll Sliders, Easy Appetizers, Party Snacks, Oven-Baked Sliders, Melty Cheese Sliders, Family Dinner, Game Day Food