
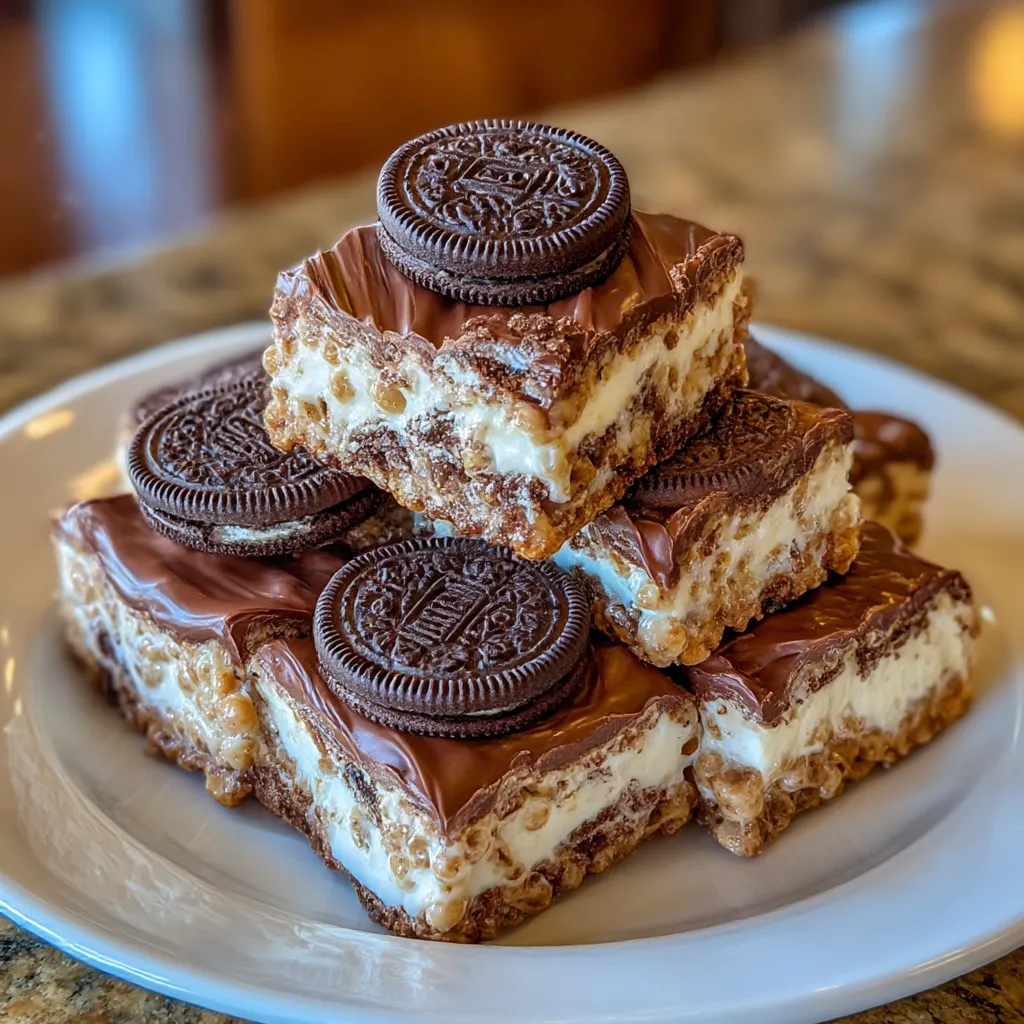
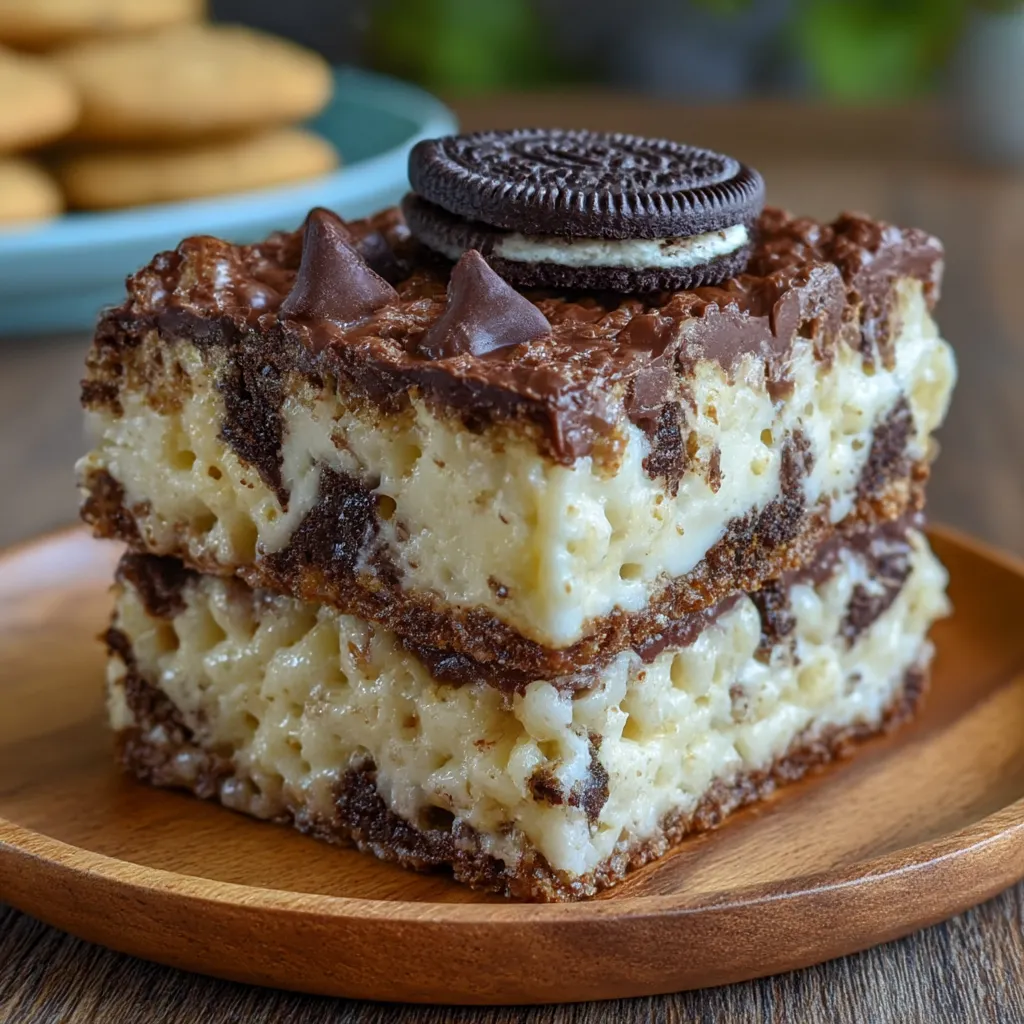
Oreo Krispies Treats are the kind of no-fuss dessert. They turn a hectic week into a sweet celebration. I’m a professional chef who loves fast, flavorful bites. This 5-ingredient, no-bake bar fits tight schedules and big cravings. Crispy Rice Krispies meet gooey marshmallows and crushed Oreos. Cookies-and-cream dreams, ready in minutes and crowd-pleasing everywhere. Perfect for parties, bake sales, school events, or a quick treat after work. In this guide, you’ll find a friendly, practical approach for busy lives. Clear steps, smart substitutions, and tips keep Oreos Krispies Treats fresh. Get ready to bake—no oven required—and delight your crew.
Table of Contents
Table of Contents
What makes Oreo Krispies Treats special
Oreo Krispies Treats are the little weeknight miracles that save me from takeout fatigue. I reach for this no-bake bar when schedules collide and cravings crash in. The magic happens fast: crispy Rice Krispies meet gooey marshmallows, then fold in crushed Oreo cookies for a cookies-and-cream punch that feels special, not cheap.
No oven means less heat, fewer dishes, and more time for what really matters. They set at room temp, so I can prep a batch in the afternoon and slice after dinner. For busy moms and professionals, this is a dependable, crowd-pleasing option that travels well and never lets you down.
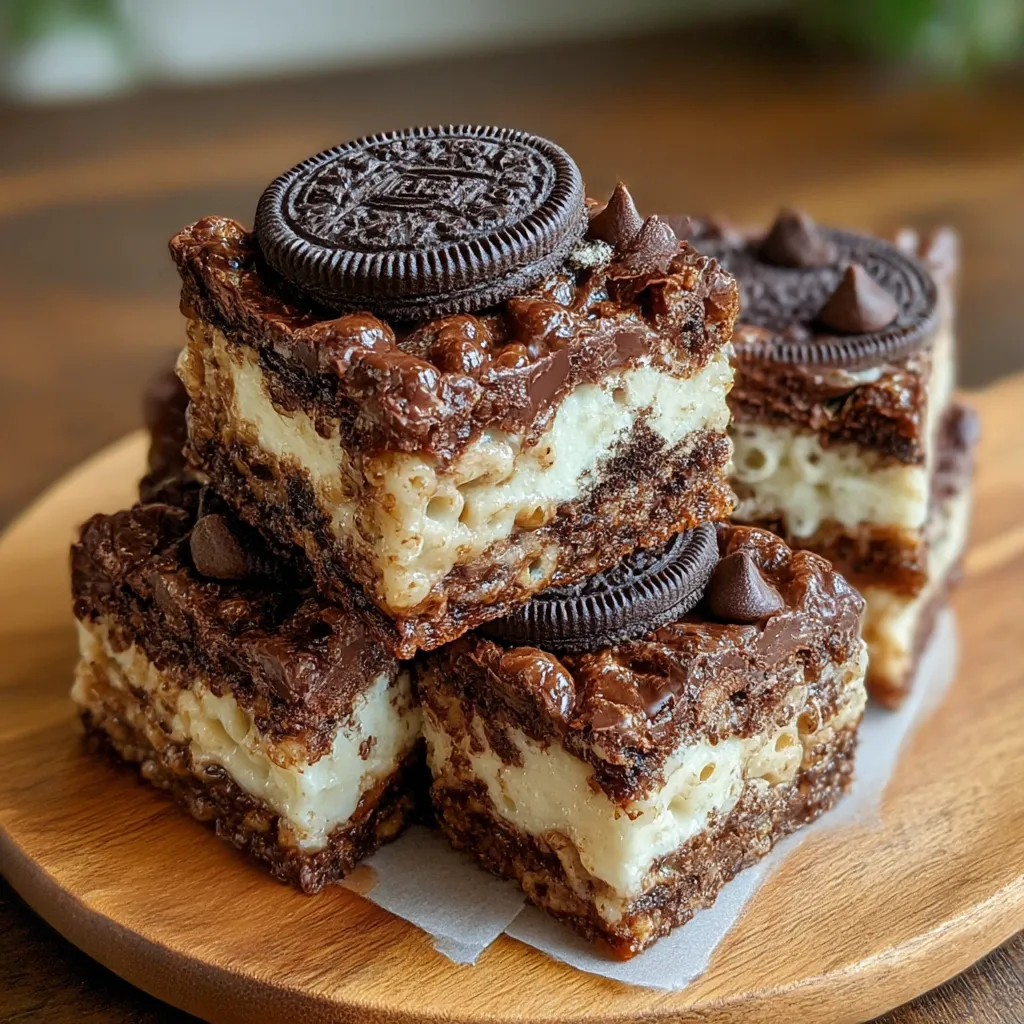
The Oreo Krispies Treats: A 5-Ingredient Wonder
Five simple ingredients make Oreo Krispies Treats a joy to pull together. I rely on Rice Krispies for the crisp bite, marshmallows for the gooey body, butter for shine and glue, crushed Oreos for the cookies-and-cream punch, and a splash of vanilla to tie it all together. If you’re watching salt, a tiny pinch is optional. This tiny lineup makes a big flavor impact, perfect for a quick dessert that still feels special.
The No-Bake Magic of Oreo Krispies Treats
No oven, no fuss, pure magic. The no-bake method lets me prep this treat in minutes and keep the kitchen cool on busy days. Melt butter with marshmallows, whisk in vanilla and salt, fold in rice cereal, then fold in crushed Oreos. The mixture stays soft enough to stir, but firm enough to slice once it hits the pan. It’s a kitchen quick-fix that still feels like a little celebration.
Cookies-and-Cream Flavor You Can Make Fast
Cookies-and-cream dreams come true in a pan. The Oreos crush quickly with a palm and a rolling pin, letting their cream centers brighten the bar. Because everything happens in a single pot, cleanup is minimal—great for a busy weeknight. The result is a bright, familiar flavor with textural pop from the crisp Rice Krispies. It’s the kind of treat that makes kids smile and adults nod in satisfied approval.
A Crowd-Pleasing Dessert for Parties and Bake Sales
This no-bake bar travels well and begs to be shared. I’ve brought Oreo Krispies Treats to school events and bake sales with zero fuss. Slice the bars neatly, wrap them, or set them out on a pretty platter. They disappear fast, even from picky eaters. The creamy crunch and kid-friendly flavor make it easy to keep a dessert table lively and approachable, no oven required to woo a crowd.
Ingredients for Oreo Krispies Treats
These ingredients come together fast to make Oreo Krispies Treats. They’re my go-to on busy days when flavor still matters. I love how the no-bake method keeps the kitchen cool.
Here are the core ingredients with exact measurements. They form the base without extra steps.
Optional add-ins and substitutions expand the flavor while keeping the recipe simple.
Exact quantities are printable at the bottom of the article.
- 6 cups Rice cereal — the essential crunch.
- 4 cups mini marshmallows — gooey binding power.
- 3 tablespoons unsalted butter — adds shine and flavor.
- 18 Oreo cookies, roughly crushed — cookies-and-cream punch.
- ½ teaspoon vanilla extract — brightens all flavors.
- Pinch of salt — enhances sweetness.
The Core Ingredients for Oreo Krispies Treats
Rice cereal, mini marshmallows, butter, Oreo cookies, vanilla, and a pinch of salt form the core. This combo delivers crunch, melt, creaminess, and the familiar cookies-and-cream punch in every bite.
Optional Add-Ins and Substitutions for Oreo Krispies Treats
Optional add-ins open up flavors. Try gluten-free cereal, extra chopped cookies, or a drizzle of melted chocolate. For dairy-free meals, swap butter for coconut oil and use dairy-free marshmallows if available.
Ingredient Tips and Sourcing for Oreo Krispies Treats
Choose standard marshmallows for easy melt and smooth texture. Buy in bulk if you’re making this for a crowd. Look for gluten-free Oreos if needed, and always check labels for dairy-free options.
How to Make Oreo Krispies Treats
Step 1: Prepare the Pan for Oreo Krispies Treats Base
I start by lining a 9×13 pan with parchment paper and giving it a light spray. I keep a greased spatula nearby so the bars lift out cleanly. This simple setup makes the no-bake Oreo Krispies Treats slice neatly every time.
Step 2: Melt Butter and Marshmallows for Oreo Krispies Treats
I melt the butter in a large pot over low heat until it glistens. I add the mini marshmallows and stir until they melt into a glossy smooth mass. I remove from heat and keep the marshmallow mixture ready to fold into the cereal.
Step 3: Stir in Vanilla and Salt for Oreo Krispies Treats
Off the heat, I whisk in vanilla and a pinch of salt to wake the flavors. The salt tames the sweetness and brings out the Oreo cookies’ cream. I give the mixture one final stir, preparing it for the cereal.
Step 4: Fold in Rice Krispies for Oreo Krispies Treats
I pour in the Rice Krispies and fold gently until every piece is coated. The key is to keep the cereal intact for that signature crunch. It helps to use a spatula greased with a touch of oil so it doesn’t stick.
Step 5: Fold in Crushed Oreos for Oreo Krispies Treats
I add the roughly crushed Oreos and fold just until they’re evenly distributed. No need to overmix; the chunks give texture and the cookies-and-cream punch shines. If your Oreos have cream melting, a light touch keeps the bars tidy.
Step 6: Press into Pan for Oreo Krispies Treats
I scrape the mixture into the prepared pan and press it in with a greased spatula. Press firmly and evenly, so the bars slice up neat and bite-size. I use the back of the spatula to smooth the top for a flat, glossy finish.
Step 7: Let Set and Slice Oreo Krispies Treats
Let the bars cool at room temperature until firm, about 20 to 30 minutes. If you’re pressed for time, a 15-minute chill in the fridge helps speed things. Then slice into bars and serve, sharing the cookies-and-cream joy.
Tips for Success
- Grease your pan and tools so nothing sticks while you assemble Oreo Krispies Treats.
- Melt marshmallows gently over low heat to avoid scorching or clumps.
- Fold in cereal quickly to keep the crunch and don’t overmix.
- Add crushed Oreos last so cookie pieces stay bright and chunky.
- Let the bars set at room temperature for a clean cut.
- Slice and wrap tightly; these treats travel well for parties and lunches.
Equipment Needed
- 9×13-inch baking pan, lined with parchment; foil is optional.
- Large pot for melting butter and marshmallows (or microwave-safe bowl).
- Spatula for mixing and pressing.
- Parchment paper or silicone mat for easy lift and slice.
- Sharp knife or bench scraper for clean cuts.
- Measuring cups and spoons for precise adding.
Variations
I love tweaking Oreo Krispies Treats to fit diets or cravings while keeping the no-bake magic.
- Use gluten-free Rice Krispies and gluten-free Oreos; always check labels for wheat-derived ingredients.
- Swap butter for coconut oil and use dairy-free marshmallows; ensure Oreos are dairy-free if needed.
- Reduce marshmallows to 3 cups and boost flavor with vanilla instead of extra sugar.
- Stir in mini chocolate chips or swap Oreos for mint or peanut butter versions.
- Add crushed pretzels or use half Rice Krispies and half cornflakes for crunch.
- Use seasonal Oreo flavors or sprinkle festive colors for holidays.
- Use vegan butter alternatives and dairy-free marshmallows; check Oreos for vegan status.
Why You’ll Love This Oreo Krispies Treats
Why you’ll love these Oreo Krispies Treats is simple: they’re incredibly easy, no oven required, and ready in minutes. I love that the flavors feel indulgent yet everyday friendly, and that a busy morning or event can be turned into a crowd-pleaser without heating up the kitchen. Plus, they slice neatly, travel well, and leave you with minimal cleanup—perfect when you’re juggling work calls, carpools, and dinner tonight and weeknights.
Serving Suggestions
- Serve Oreo Krispies Treats with a cold glass of milk or a vanilla latte for a cookies-and-cream finish.
- Present them on a pretty platter with parchment wedges for easy grabbing.
- Dust with extra Oreo crumbs and a light white chocolate drizzle for color pop.
- Bundle bars with twine for charm.
Make-Ahead, Storage, and Freezer Tips for Oreo Krispies Treats
These no-bake bars travel and store well, so I love making them ahead. I often press and slice a batch the day before a party, then cover tightly until service. That way, I can focus on the main menu and still offer a crowd-pleasing Oreo Krispies Treats.
Make-ahead steps: press into the pan and let it set at room temperature before slicing. Then cover tightly with parchment or plastic wrap and refrigerate overnight if you want extra-firm bars. When you’re ready to serve, lift the slab, slice, and plate.
Storage tips: keep Oreo Krispies Treats in an airtight container away from heat and humidity. At room temperature they stay fresh for up to 3 days; for longer life, refrigerate and let them come to room temp before slicing for best texture.
Freezer option: wrap individual bars, then freeze up to 2–3 months. Thaw on the counter or in the fridge and enjoy the same cookies-and-cream bite.
FAQs
Are Oreo Krispies Treats truly no-bake bars?
Yes. They come together on the stovetop and set at room temperature, so no oven is needed. It’s a quick way to satisfy a craving without heating up the kitchen.
Can I adapt Oreo Krispies Treats for gluten-free or dairy-free diets?
Absolutely. Use gluten-free Rice Krispies and gluten-free Oreos. For dairy-free, swap butter for coconut oil and choose dairy-free marshmallows; always check labels for dairy-free options.
How long do Oreo Krispies Treats stay fresh?
In an airtight container at room temperature, they’re best within 3 days. Refrigeration extends their life, and bring them to room temp before slicing or serving.
Can I freeze Oreo Krispies Treats?
Yes. Wrap individual bars and freeze for 2–3 months. Thaw on the counter or in the fridge for best texture before serving.
Can I make these ahead for events or parties?
Definitely. Press and set the bars, then refrigerate overnight if you like. Slice and serve at room temperature for crisp edges and tidy portions.
Final Thoughts
I reach for Oreo Krispies Treats when a busy week needs a sparkle.
These no-bake bars prove flavor can shine without heating up the kitchen today.
With five ingredients and simple steps, I feed a crowd fast.
I love the way the kids light up when they bite into the crunchy, creamy cookies.
I also appreciate how forgiving the recipe is for improvisation and late-night cravings.
From bake sales to school lunches, these treats travel well.
They stay tasty with a gentle wrap and room-temp storage.
Plus, creating them is a tiny celebration I can share with friends and family everywhere.
Print
Oreo Krispies Treats deliver 5-ingredient delicious bars.
- Total Time: 40 minutes
- Yield: 16 servings 1x
- Diet: Vegetarian
Description
Oreo Krispies Treats: Irresistible no-bake bars that pair crispy Rice Krispies with gooey marshmallows and crushed Oreo cookies for a cookies-and-cream treat that’s perfect for parties, bake sales, or a quick dessert.
Ingredients
- 6 cups rice cereal
- 4 cups mini marshmallows
- 3 tbsp unsalted butter
- 18 Oreo cookies, roughly crushed
- ½ tsp vanilla extract
- Pinch of salt
Instructions
- Line a 9×13-inch pan with parchment paper and lightly grease it.
- In a large pot over low heat, melt the butter. Add marshmallows and stir until fully melted and smooth.
- Remove from heat and stir in vanilla extract and salt.
- Gently fold in rice cereal until evenly coated.
- Add crushed Oreo cookies and mix just until combined.
- Press the mixture evenly into the prepared pan using a greased spatula.
- Let set at room temperature until firm, then cut into bars and serve.
Notes
- No-bake treats come together quickly and set at room temperature.
- Line the pan with parchment paper for easy removal and clean bars.
- Yields 16 bars; store in an airtight container at room temperature for up to 3 days or refrigerate for longer freshness.
- For variations, substitute gluten-free cereal and cookies to make a gluten-free version (note: verify ingredients).
- Prep Time: 15 minutes
- Cook Time: 0 minutes
- Category: Dessert
- Method: No-Bake
- Cuisine: American
Nutrition
- Serving Size: 1 bar
- Calories: Approx. 150 kcal
- Sugar: Approx. 11 g
- Sodium: Approx. 100 mg
- Fat: Approx. 6 g
- Saturated Fat: Approx. 4 g
- Unsaturated Fat: Approx. 2 g
- Trans Fat: 0 g
- Carbohydrates: Approx. 20 g
- Fiber: 0 g
- Protein: Approx. 2 g
- Cholesterol: Approx. 6 mg
Keywords: Oreo Krispies Treats, Oreo Rice Krispies, no-bake bars, cookies and cream bars, Oreo dessert, 5-ingredient treat, kids snacks, quick dessert