
Cheeseburger Sliders are the kind of dish I reach for when the calendar is full and the kitchen timer is ticking. I’m a chef who juggles recipe development with real-life deadlines, and I built this 30-minute slider plan to deliver big flavor without sacrificing family time. On AllensRecipes, I’ve learned that busy moms and professionals want meals that come together fast, travel well, and look impressive enough to serve to guests. This Cheeseburger Sliders recipe combines ground beef, melty cheddar, dill pickles, and a buttery sesame finish into a crowd-pleasing bite that keeps leftovers delicious. Follow along for practical steps, pantry-friendly ingredients, and tips to make party hosting easy and fun. You’ll move from prep to plates in a snap, with juiciness intact for every guest.
Table of Contents
Table of Contents
what make this Cheeseburger Sliders special
Cheeseburger Sliders are my secret weapon when the week gets busy. I reach for them when the calendar is full. They deliver big flavor fast. I love that they taste indulgent yet come together in 30 minutes. They travel well, look festive on a platter, and reheat gracefully. That mix of comfort and practicality is why I keep teaching this recipe. In my kitchen, it becomes a win for busy moms and professionals alike. The recipe blends juicy beef, cheddar, pickles, and a butter-sesame finish. It’s easy to prep in stages. Perfect for last-minute guests. I love how the kitchen smells like a party. And cleanup stays friendly with a simple baking sheet.
Why this recipe is perfect for busy moms and professionals
I crafted this for moms who juggle schedules. It comes together in 30 minutes and still tastes special.
The assembly-line approach saves time and reduces kitchen chaos. Leftovers reheat beautifully for busy weeknights. Cheeseburger Sliders stay reliable week after week.
Flavor, speed, and make-ahead potential
Flavor is bold, thanks to cheddar, pickles, and a butter-sesame glaze. Speed comes from simple steps: season, brown, layer, bake.
Make-ahead is king: assemble, refrigerate, bake when ready. The sliders stay juicy for guests or late-night cravings. Cheeseburger Sliders are a go-to for simple, show-stopping entertaining.
Ingredients Cheeseburger Sliders
Cheeseburger Sliders start with simple, pantry-friendly ingredients. I love when flavor shines without extra fuss. This lineup keeps prep fast, affordable, and flexible for guests. Exact quantities print-ready at the bottom of the article.
Design is as important as taste here.
If you’re shopping for a crowd, these items scale up easily.
Pantry-ready lineup and quick substitutions
- 2 lbs ground beef
- 1 tsp salt
- ½ tsp black pepper
- 1 tsp garlic powder
- 1 tsp onion powder
- 24 slider buns
- 12 slices cheddar cheese, cut in half
- ½ cup dill pickle slices
- ¼ cup ketchup
- ¼ cup mayonnaise
- For the butter topping: 4 tbsp butter, melted
- 1 tsp sesame seeds
- ½ tsp garlic powder
Optional additions and substitutions help tailor the sliders to your crowd.
Optional additions and tips for sourcing
- Optional: sliced onions, diced tomatoes, or a touch of mustard
- Substitutions: turkey or plant-based patties, gluten-free slider buns, or different cheeses (Swiss, American, or pepper jack)
- Print-friendly note: exact quantities are listed above and available at the bottom for printing
How to Make Cheeseburger Sliders
Step 1 — Prep and season the beef
I start by gathering 2 pounds of ground beef and sowing in flavor. I sprinkle 1 teaspoon of salt, ½ teaspoon black pepper, 1 teaspoon garlic powder, and 1 teaspoon onion powder. I mix gently, just enough to blend the spices without mushing the meat.
Quick tip for even seasoning and handling
Keep the beef cold while you mix. Use clean hands or a wooden spoon, and stop when the spices disappear into the meat. Rest the mix for a few minutes if you can; it helps the flavors cling without overworking the beef.
Step 2 — Brown the beef and prep buns
I heat a large skillet over medium heat and crumble the seasoned beef. I cook until browned, breaking it into small, even bits so every bite is juicy. I drain off the excess fat to keep the sliders bright and not greasy.
Draining fat and ensuring juiciness
Slice the buns horizontally and lay the bottom halves in a greased baking dish. If you like softer buns, you can brush the cut sides with a touch of butter before layering the meat. This keeps the base from getting soggy later.
Step 3 — Assemble the sliders
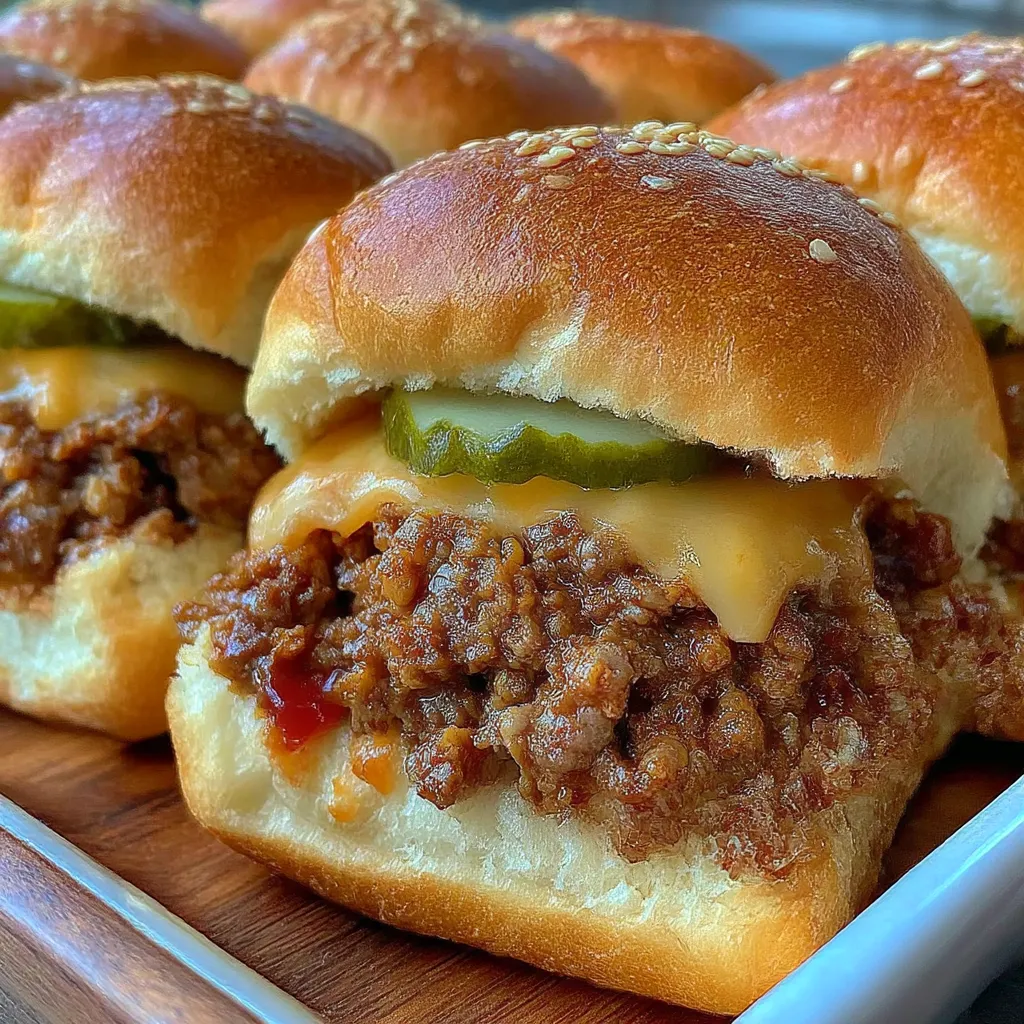
Now I layer the build: spread the hot beef over the bottom buns, then lay half-slices of cheddar on top. Dill pickle slices go next, providing that classic tang. Finally, I whisk ketchup and mayonnaise and spread them on the top buns before placing them over the sliders.
Layering cheese and pickles for flavor balance
The cheese melts against the warm beef, and the pickles give a crisp zing. I love how the mayo-ketchup mix adds a creamy glaze that keeps every slider tasting indulgent but bright. This is where the party vibes begin to dock in your kitchen.
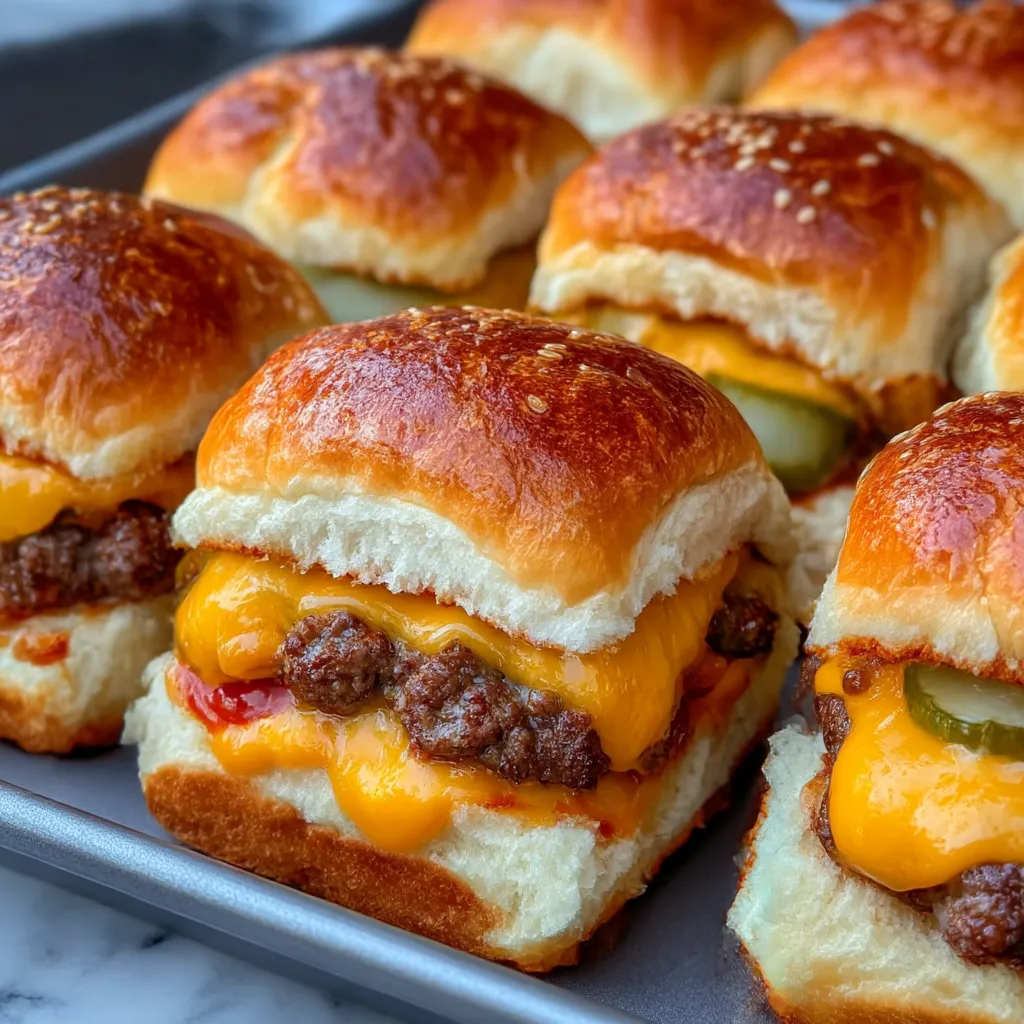
Step 4 — Bake and finish with butter topping
I preheat the oven to 350°F (175°C) as the sliders wait. I cover the dish loosely with foil and bake for 15 minutes to melt the cheese and marry the flavors. Then I uncover and bake 5–7 more minutes until the tops are golden and melty.
Why the butter-sesame finish matters
While the sliders bake, I whisk 4 tablespoons melted butter with 1 teaspoon sesame seeds and ½ teaspoon garlic powder. After the first bake, I brush this butter mixture over the tops. It creates a glossy, fragrant finish that tastes like a party in a pan.
Step 5 — Slice, serve, and reheat tips
Once baked, I let the pan rest a minute, then slice the sheet into 24 neat sliders. They’re best served warm, with the gooey cheese still shiny and inviting. If you’re feeding a crowd, arrange them on a platter with parchment for easy grabbing.
Storing leftovers for quick future meals
Leftovers refrigerate well. To reheat, bake at 350°F until warmed through, which helps the buns stay soft and the cheese melt stays dreamy. Reheating in the oven beats the microwave for texture and taste.
Tips for Success
Smart shortcuts and timing
- Assemble and refrigerate unbaked sliders up to 24 hours before baking. This saves prep.
- Use pre-sliced cheese to speed assembly. It ensures even melt across all sliders.
- Bake the Cheeseburger Sliders covered first if buns look soft. Then uncover to finish for browning.
- If time is tight, pre-slice toppings the night before. This speeds assembly and keeps workflow smooth.
- Keep a small timer handy to stay on track during prep.

Equipment Needed
Time-saving tools and alternatives
- Large skillet or baking dish — browns beef and bakes sliders in one pan.
- Sharp knife and cutting board — clean prep and quick topping slicing.
- Pastry brush for butter topping — even, glossy finish on tops.
- Optional: sheet pan liner or parchment for easy cleanup — speeds cleanup.
Variations
Flavor twists to try
- BBQ Cheeseburger Sliders with tangy sauce
- Mushroom and Swiss sliders for a richer bite
- Spicy jalapeño cheddar sliders
- Turkey or turkey-veggie patties for lighter options
- Gluten-free buns or lettuce-wrap version
Why You’ll Love This Cheeseburger Sliders
As a busy home cook, I reach for these sliders when time is tight. They come together in about 30 minutes and still taste like a celebration.
Juicy beef, melty cheddar, and crisp pickles make Cheeseburger Sliders shine with minimal effort. They travel well, serve crowd, and reheat for leftovers.
Plus, the butter-sesame finish makes every bite feel special, even on weeknights. It’s practical, friendly, and surprisingly fun to share.
Serving Suggestions
Party-ready pairings and presentation ideas for Cheeseburger Sliders
- Crispy potato wedges or sweet potato fries for crunch and color
- Classic lemonade or iced tea to refresh the palate
- Fresh dill pickles or pickle chips on the side for tang
- Arrange sliders on a tray with parchment for easy serving and clean lines
- Set out napkins and sauces too
Party-Ready Make-Ahead Cheeseburger Sliders for Game Day
Make-ahead prep steps
For game day, I love making Cheeseburger Sliders in advance. They feed a crowd without stealing my evening. Here’s how I prep them so you can bake once, slice, and serve hot with minimal fuss.
- Assemble and refrigerate the unbaked sliders up to 24 hours before baking. Lay them on a parchment-lined sheet pan, cover tightly with plastic wrap, and keep them in the fridge. Label the tray with the bake day to stay organized.
- Bake when ready and finish with the butter topping. Preheat to 350°F, bake covered for 15 minutes to meld flavors, uncover for 5–7 minutes until tops are golden, then brush with the sesame-garlic butter for shine and aroma.
- Reheat tips to keep buns soft and cheese melty. Reheat leftovers in a low oven (325–350°F) for 10–15 minutes, or rewarm the whole tray covered to preserve moisture. Slice just before serving for tidy, bite-ready results.
FAQs
Can I make Cheeseburger Sliders ahead of time?
Yes. Cheeseburger Sliders can be prepped ahead for busy days. You can assemble unbaked sliders and refrigerate up to 24 hours before baking. I like to set the pan on a parchment-lined sheet so cleanup is a breeze.
Or bake them, cool, and store in the fridge for late serving. They stay juicy if you reheat gently. Reheat in a 350°F oven until warmed through, then slice and serve.
Can I freeze baked or unbaked sliders?
Yes. You can freeze both baked and unbaked Cheeseburger Sliders. I use this trick for big parties.
Unbaked sliders can be frozen up to 1–2 months. Bake from frozen, adding about 15–20 minutes. Baked sliders can be frozen after cooling; reheat at 325°F to keep moisture and melt intact. They taste just as good when warmed through.
Can I substitute different cheese or buns?
Absolutely. Try Swiss, American, or pepper jack for different vibes in Cheeseburger Sliders. It’s easy to switch cheese without changing the rest.
For buns, choose gluten-free options or lettuce wraps for lower carbs. If you use turkey or veggie patties, tweak the seasoning a touch to keep flavor balanced.
Are these suitable for kids or a crowd with dietary needs?
Yes, they’re kid-friendly and crowd-ready. I’ve seen kids practically fight over which slider gets a bite.
They work for potlucks and weeknight dinners alike. I’ve seen hungry families light up at these little burgers.
Keep toppings mild and offer plain patties if needed. With Cheeseburger Sliders, you can tailor these bites to fit any diet.
For dietary needs, swap to turkey or veggie patties, use gluten-free buns, or dairy-free cheese. You can even skip cheese if anyone is dairy-intolerant.
How do I reheat leftovers without drying out the sliders?
Reheat Cheeseburger Sliders in the oven for best texture. I always keep an eye on the cheese melt and keep things juicy.
Cover the pan with foil and warm at 350°F for 10–15 minutes. If you must use the microwave, place a damp paper towel over the sliders to retain moisture, but expect softer buns. This helps keep the texture lively and avoids a soggy bottom.
Final Thoughts
Cheeseburger Sliders are more than a quick dish to me; they’re a little party in a pan. In a week that never stops, I count on them to deliver big flavor fast. I love how the kitchen fills with the scent of butter and sesame.
These bites travel well and reheat beautifully. That means less time at the stove and more time with the people I serve. They turn ordinary weeknights into tiny celebrations.
If you need weeknight comfort with a party vibe, Cheeseburger Sliders never fail. I hope you try them soon and taste the same joy I do.
Serving Suggestions
Party-ready pairings and presentation ideas for Cheeseburger Sliders
- Crispy potato wedges or sweet potato fries for crunch and color
- Classic lemonade or iced tea to refresh the palate
- Fresh dill pickles or pickle chips on the side for tang
- Arrange sliders on a tray with parchment for easy serving and clean lines
- Set out napkins and sauces too
Party-Ready Make-Ahead Cheeseburger Sliders for Game Day
Make-ahead prep steps
For game day, I love making Cheeseburger Sliders in advance. They feed a crowd without stealing my evening. Here’s how I prep them so you can bake once, slice, and serve hot with minimal fuss.
- Assemble and refrigerate the unbaked sliders up to 24 hours before baking. Lay them on a parchment-lined sheet pan, cover tightly with plastic wrap, and keep them in the fridge. Label the tray with the bake day to stay organized.
- Bake when ready and finish with the butter topping. Preheat to 350°F, bake covered for 15 minutes to meld flavors, uncover for 5–7 minutes until tops are golden, then brush with the sesame-garlic butter for shine and aroma.
- Reheat tips to keep buns soft and cheese melty. Reheat leftovers in a low oven (325–350°F) for 10–15 minutes, or rewarm the whole tray covered to preserve moisture. Slice just before serving for tidy, bite-ready results.
FAQs
Can I make Cheeseburger Sliders ahead of time?
Yes. Cheeseburger Sliders can be prepped ahead for busy days. You can assemble unbaked sliders and refrigerate up to 24 hours before baking. I like to set the pan on a parchment-lined sheet so cleanup is a breeze.
Or bake them, cool, and store in the fridge for late serving. They stay juicy if you reheat gently. Reheat in a 350°F oven until warmed through, then slice and serve.
Can I freeze baked or unbaked sliders?
Yes. You can freeze both baked and unbaked Cheeseburger Sliders. I use this trick for big parties.
Unbaked sliders can be frozen up to 1–2 months. Bake from frozen, adding about 15–20 minutes. Baked sliders can be frozen after cooling; reheat at 325°F to keep moisture and melt intact. They taste just as good when warmed through.
Can I substitute different cheese or buns?
Absolutely. Try Swiss, American, or pepper jack for different vibes in Cheeseburger Sliders. It’s easy to switch cheese without changing the rest.
For buns, choose gluten-free options or lettuce-wrap version for lower carbs. If you use turkey or veggie patties, tweak the seasoning a touch to keep flavor balanced.
Are these suitable for kids or a crowd with dietary needs?
Yes, they’re kid-friendly and crowd-ready. I’ve seen kids practically fight over which slider gets a bite.
They work for potlucks and weeknight dinners alike. I’ve seen hungry families light up at these little burgers.
Keep toppings mild and offer plain patties if needed. With Cheeseburger Sliders, you can tailor these bites to fit any diet.
For dietary needs, swap to turkey or veggie patties, use gluten-free buns, or dairy-free cheese. You can even skip cheese if anyone is dairy-intolerant.
How do I reheat leftovers without drying out the sliders?
Reheat Cheeseburger Sliders in the oven for best texture. I always keep an eye on the cheese melt and keep things juicy.
Cover the pan with foil and warm at 350°F for 10–15 minutes. If you must use the microwave, place a damp paper towel over the sliders to retain moisture, but expect softer buns. This helps keep the texture lively and avoids a soggy bottom.
Final Thoughts
Cheeseburger Sliders are more than a quick dish to me; they’re a little party in a pan. In a week that never stops, I count on them to deliver big flavor fast. I love how the kitchen fills with the scent of butter and sesame.
These bites travel well and reheat beautifully. That means less time at the stove and more time with the people I serve. They turn ordinary weeknights into tiny celebrations.
If you need weeknight comfort with a party vibe, Cheeseburger Sliders never fail. I hope you try them soon and taste the same joy I do.
Serving Suggestions
Party-ready pairings and presentation ideas for Cheeseburger Sliders
- Crispy potato wedges or sweet potato fries for crunch and color
- Classic lemonade or iced tea to refresh the palate
- Fresh dill pickles or pickle chips on the side for tang
- Arrange sliders on a tray with parchment for easy serving and clean lines
- Set out napkins and sauces too
Cheeseburger Sliders Deliver 30-Minute Ultimate Party Hit.
- Total Time: 30 minutes
- Yield: 24 sliders 1x
- Diet: Low Fat
Description
Cheeseburger Sliders are juicy, cheesy mini burgers packed with classic burger flavor in a shareable, crowd-pleasing bite. Ready in just 30 minutes, they’re perfect for parties, game day, family dinners, or make-ahead meals that reheat beautifully and disappear fast.
Ingredients
- 2 lbs ground beef
- 1 tsp salt
- ½ tsp black pepper
- 1 tsp garlic powder
- 1 tsp onion powder
- 24 slider buns
- 12 slices cheddar cheese, cut in half
- ½ cup dill pickle slices
- ¼ cup ketchup
- ¼ cup mayonnaise
- For the butter topping: 4 tbsp butter, melted
- 1 tsp sesame seeds
- ½ tsp garlic powder
Instructions
- Preheat oven to 350°F (175°C).
- In a bowl, season ground beef with salt, pepper, garlic powder, and onion powder.
- Press beef evenly into a large skillet or baking dish and cook until browned. Drain excess fat.
- Slice slider buns in half horizontally and place bottom halves in a greased baking dish.
- Spread cooked beef evenly over the buns.
- Layer cheese slices and pickles on top.
- Spread ketchup and mayonnaise on the top buns, then place them on the sliders.
- Mix melted butter with sesame seeds and garlic powder. Brush over tops.
- Cover loosely with foil and bake for 15 minutes. Uncover and bake 5–7 more minutes until golden and melty.
- Slice and serve warm.
Notes
- Tip: Assemble sliders ahead of time and refrigerate until ready to bake for easier party prep.
- For softer buns, cover loosely with foil during the first bake, or adjust time slightly if needed.
- Leftovers refrigerate well and reheat in a 350°F oven until warmed through.
- Prep Time: 10 minutes
- Cook Time: 20–25 minutes
- Category: Appetizers, Party Food
- Method: Baking
- Cuisine: American
Nutrition
- Serving Size: 1 slider
- Calories: Approx. 240–260 kcal
- Sugar: ~3 g
- Sodium: ~350–450 mg
- Fat: 12–14 g
- Saturated Fat: 5–6 g
- Unsaturated Fat: 6–7 g
- Trans Fat: 0–1 g
- Carbohydrates: 22–24 g
- Fiber: 1 g
- Protein: 12–15 g
- Cholesterol: 60–70 mg
Keywords: Cheeseburger Sliders, mini burgers, sliders, party appetizers, burger sliders, 30-minute recipe, easy entertaining, game day snacks, crowd-pleasing bites